In a previous post called Ingredients I already referred that the colors in my soaps are the result of the ingredients I use to make them. So in this post I’ll show you some examples.
My soap line is completely natural, no added fragrances or colors. I am thinking of developing another line with added scents and colors further down the road.
Colored with carrot puree and beetroot powder
Some botanicals are great soap colorants, others not so much, lavender buds or rose petals will turn brown with saponification (process through which the oils are transformed into soap). The beetroot vibrant color also gets lost in saponification but you can still profit from its benefits.
Soap colored using spirulina powder
Cinnamon used for the darker swirls.
I also use clays, especially in facial soaps because they have a slightly exfoliating effect and many benefits for the skin.
Green french clay used for the green swirls.
Rhassoul clay used for the darker swirls.
Other great colorant is cacao and coffee, they both give a brown color to the soap and exfoliating benefits.
Coffee and cacao used for the darker swirls and exfoliation.
As you can see there are a lot of natural options to color homemade soaps. If you are a soap maker feel free to share your experiences and if you’re not, your feedback is also welcomed!
A few weeks ago a friend shared a very interesting (in a terrifying way) article about commercial scrubs. Apparently the ‘exfoliating ingredients’ used in such scrubs and other commercial skin care products are plastic micro-breads, which will end up in the rivers and oceans polluting them. They’re not biodegradable, quite the opposite, they absorb toxins and are small enough for fishes to confuse them with food and eat them. I kept on researching about the topic and I found this other article from 2013 if you’d like to know more about this subject.
I always use natural and biodegradable ingredients on my scrubs. In my ‘Good Morning Soap’ I use real grounded coffee. For a softer soothing scrub, like my ‘Oats and Honey Soap’ I use grounded oats. Clays and baking soda are very good for facial scrubs, depending on your skin type.
Exfoliating soap with grounded coffee
So, for you to replace all those commercial scrubs for healthier and sustainable alternatives I decided to share a DIY Luxurious Body Scrub. It is no secret that I like the combination of chocolate with orange (check out the recipe of these Gluten-free, Sugar-free Cacao Orange Brownies), so that is the scent I am going for here and you can actually eat this, but please don’t, use it on your skin instead!
Ingredients:
¾ cup Brown sugar (or any type of sugar)
1 Tbsp raw cacao powder
2-3 Tbsp Sweet Almond oil (or other light carrier oil)
10-20 drops Sweet Orange Essential Oil
Mix sugar and cacao first, then add the oil a little at a time until you get a nice consistency. I like it thick, it is easier to use. After you get the right consistency just add the essential oil and mix. Scoop it into a sterilized container. Use this once or twice a week on your body, massaging it on the skin with your hands.
This should keep 3 weeks to a month; I don’t recommend keeping this longer because of bacterial growth. Though the high amount of sugar will keep this safe for a nice period of time without a preservative, every time you use this some water will still get in, the more water the more the chance of developing bacteria. If you’d like to keep this for longer you must add a preservative.
A little info about the ingredients:
Sugar is the ‘exfoliating component’ it will help remove dead cells from the top layer of your skin.
Raw Cacao Powder, be sure it is unsweetened without other ingredients, for maximum benefits. Raw Cacao is a very potent anti-oxidant, it helps improve blood circulation and has rejuvenating properties that will restore your youth glow.
Sweet Almond Oil is very gentle and moisturizing.
Sweet Orange Essential Oil is uplifting and smells amazing!!
You can also experiment with other ingredients instead of sugar, such as salt or coffee. Just don’t use salt if you have open wounds, as it will sting. You can also leave the cacao and essential oil out a do a basic scrub if you’re in a hurry, but the benefits will be less.
Salt, sugar, coffee
As always I hope you enjoy this scrub, let me know if you decide to try it!
There you will find hand made natural skin and hair care products. Some of the recipes I will share on this blog along with healthy tips to get rid of harmful chemicals in your life. It has been and still is a long journey; so let’s make it together!
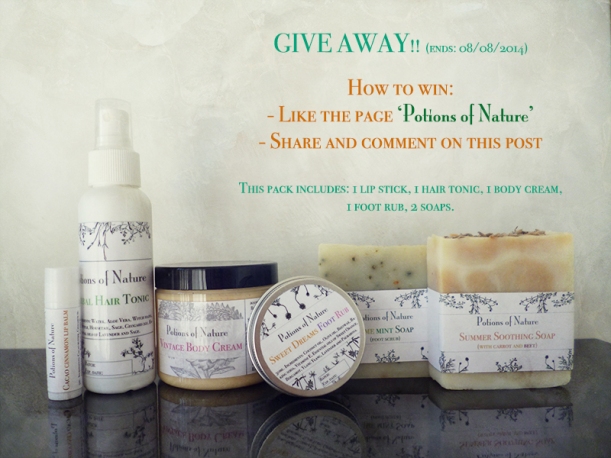
I am also hosting a give away on Facebook to celebrate the opening of the store. This give away and the store are only available for people living in Europe, as the shipping costs outside Europe are extremely high and I’m not sure people will be willing to pay more for the shipping than the products themselves. If you live in another country I would still appreciate if you’d support my store and blog by sharing and following 🙂
Participate here https://www.facebook.com/PotionsOfNature
The shipping costs for the give away are supported by me, so the winner will get this awesome pack completely free!!
After August 8th, one winner will be chosen randomly.
Wait! Don’t through away those ripe bananas just yet, use them to make this delicious cake!
Everyone knows that in the summer the fruit ripens faster and sometimes we don’t eat it fast enough before they start to get brown. The best away to salvage them is to use them in cakes or tarts. So today we are cooking a very easy and fast banana cake. I hope you enjoy!
Ingredients:
– 2 over ripen large bananas (mashed)
– 2 cups all-purpose gluten free flour
– ¾ cup coconut sugar
– ½ cup coconut oil (melted)
– 2 eggs
– 1 tsp baking powder
– 1 tsp vanilla extract
– Pecans (optional)
Mix all ingredients together, except pecans until smooth.
Pour mixture in a mold.
Bake at 200º C for 30-40 minutes.
Check the top of the cake after 15-20min, if it gets golden on top cover with foil and let cook till the end.
I really enjoy making scent combinations, so I decided to make a Floral pot pourri and share this project with you. No more store bought pot pourris with added colorants and smell.
This only has 2 main ingredients: dried flowers and essential oil.
You can dry the flowers yourself or buy dried flowers, if you buy be sure to check that they are chemical free. You can find many beautiful and scented dried flowers in the tea section of natural stores.
In this recipe I used rose flowers (from my garden and dried at home), calendula, lavender and a flowery citrus blend of essential oils.
Put whatever quantity of flowers as you like in your container. I prefer to layer them instead of mixing them, but this is up to you. To the top layer add 10-15 drops of the essential oils blend.
Flowery citrus relaxing blend:
– 15 drops Bergamot
– 15 drops Palmarosa
– 10 drops Lemongrass
– 10 drops Lavender
– 10 drops Ylang Ylang
I blend the oils in a small container so I can store the remaining, which I will use again when I feel the pot pourri is losing it’s scent. I was out of dark glass bottles (see here how to choose and store Essential Oils) so I stored this in a clear plastic container. I will still keep it in a dark cool place, but I will use it soon enough so this type of bottle won’t be a problem. Don’t forget to label your bottle, I didn’t do it here so you can see the oil inside in the picture, but I did it afterwards.
There are infinite combinations of flowers; herbs and spices that will make a great pot pourri, so enjoy experimenting and let me know how it goes!
Baking soda is one of the ingredients that you should always have in your pantry. It is very versatile and natural, so no more nasty chemicals! Below is a list of 10 ways I use baking soda around the house. If this is one of your favorite products, share below your experiences.
Freshen up dry cleaning clothes
Mix a 1 cup water and 1 Tbsp of baking soda in a spray bottle, mix well and spray on clothes. This will not work on stains though.
Litter box cleaner and deodorizer
Once a month I wash my cat’s litter box with a mix of baking soda and vinegar to get rid of the nasty smells. Empty the litter box and rinse it with hot water, sprinkle with baking soda (about 2Tbsp) and then add distilled white vinegar (about ½ cup), let the 2 components react, they will start bubbling. Then scrub well, rinse and let air dry if possible. When dried sprinkle some baking soda on the bottom before adding new litter, this will prevent the odor from spreading when you cat uses it.
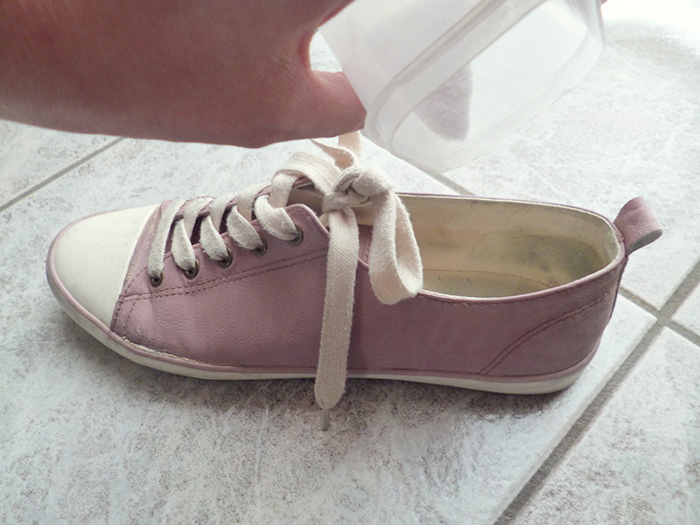
Mix of 1 Tbsp baking soda and 2 drops tea tree essential oil and sprinkle on smelly shoes. The tea tree will give extra anti fungal power but this will work fine without it.
No more smelly shoes!
Foot exfoliator
Quick fix for softer feet: mix 2 Tablespoons olive oil with 1 Tbsp baking soda and massage your feet with this. Leave for 15min and then rinse.
Baking
If you are out of baking powder you can use baking soda together with an acid component (lemon juice, citric acid, buttermilk, cocoa powder, vinegar, etc.) to make your cakes and bread rise.
Once a month or up to once a week, mix a teaspoon of baking soda with a few drops of lemon juice to form a paste, apply to teeth and scrub gently for a few minutes then rinse. Do not over do this because it can sensitize your teeth and damage the enamel.
Deodorize mattresses and carpets.
Sprinkle some baking soda on your carpets and mattresses and let it rest for 15 to 30 minutes, then vacuum. You’ll notice the difference! You can mix a few drops of lavender essential oil for a nice and relaxing scent.
Sprinkle on carpet, let sit for 15min and then vacuum.
Clean carpets (cat fur balls and other gunk)
Just a few days ago, my cat vomited a fur ball in the living room carpet and it was really nasty. I removed the fur ball but then there was a brown stain right in the white stipe of the carpet! I wasn’t sure this was going to work, but since I use this method to clean other things I decided to try. I covered the stain with baking soda and pressed it into the carpet, then I spilled distilled white vinegar on top and let it bubble. After all the baking soda disappeared I scrubbed with a microfiber cloth and it easily came out. I was pleasantly surprised!
There are a thousand more ways to use baking soda. I’ll do more posts on this topic, so be sure to follow the blog to get all the updates!
And because this isn’t all about being healthier on the outside, but also on the inside, I would like to share a delicious recipe that has been a favorite here at home in the last weeks.
This is gluten-free and sugar-free, I always buy organic whenever available. You can find most of these ingredients in natural food stores.
I use a mixture of 3 different flours, and 2 types of natural sweeteners. I believe you can replace some of the ingredients for other alternatives, though I haven’t tried it.
Ingredients (makes 9 square brownies):
– 1 cup Rice flour
– ½ cup Almond flour
– ½ cup Buckwheat flour
– ¾ cup Agave syrup
– ½ cup Coconut oil
– ½ cup Cacao butter
– 1 Tbsp Green Stevia (grounded leaves)
– 2 Tbsp Cacao powder
– 1 Egg
– Juice and zest of 1 Orange
– 3 Tbsp Raw cacao nibs (broken cacao beans)
– ¼ tsp Celtic salt
– ¼ tsp Baking soda
Rice flour, almond flour and buckwheat flour.
Measure the flours and place them in a big bowl. Measure and add the rest of the dry ingredients and mix.
Green Stevia, baking soda, celtic salt and cacao powder
Mix all the dry ingredients.
Place the coconut oil and cacao butter in a ceramic bowl and microwave it in 30-second periods until almost melted (the small pieces will melt by them selves in the warm oil).
Cacao butter and coconut oil
Add to the dry ingredients, the agave syrup, oils and egg and mix.
Add oils, agave and egg.
Then add the zest and juice of the orange and mix.
Orange zest and juice.
Add them to the mix.
When you have thick homogeneous dough, add the raw cacao nibs and fold them with the rest of the ingredients.
Raw cacao nibs.
Fold them in.
Prepare a shallow square dish by brushing it with some melted coconut oil and lining the bottom with baking paper. Pour the mixture and bake it the pre-heated oven for 10-15 minutes at 200º C.
Oil and line your mold.
Pour the mixture in.
After 10-15 minutes, you should see some cracks on the crust. use a toothpick to check if the bownie is cooked in the middle.
Enjoy!
Let me know if you’ve tried this recipe and what do you think of it, I’d also love to know if you have any topic you’d like me to write about!
Today, I bring you a very easy and fresh DIY project.
How nice is it to walk into a fresh smelling home? Very nice indeed, it is comfortable and pleasant and gives the sensation of cleanliness. Though sometimes there are smells we cannot avoid around the house (food, pet litter boxes, tobacco, etc.), we can sure try to mask them with the right ingredients.
For this project you will need:
– Empty tea bags (I use XL unbleached tea bags)
– String to tie the bags
– Baking soda
– Dried lavender buds
– Lavender essential oil
This is what you’ll need.
You will have to adjust the quantities to the size of the tea bags you are using; in my case I used 2 Tbsp baking soda, 1 tsp lavender buds and 5 drops lavender EO per bag. Just mix all the ingredients in a bowl and fill the bags, tie them with string and place them wherever you want. I always have one in my car and one behind my cat’s litter box (this one without the essential oils, as it can be toxic to cats). These are also useful to keep near the toilet. You will need to replace the bags from time to time, as they will lose their potency.
Why these ingredients?
– Baking soda: one of the greatest odor neutralizers you can use at home, it will absorb the nasty smells.
– Lavender: you can use any type of scent you like; I choose lavender because I love the aroma and the lavender essential oil is also relaxing and calming.
Other scent combinations:
– Cinnamon: crushed cinnamon sticks and cinnamon essential oil; antibacterial and tonic.
– Citrus: lemon, lime and/or orange peels and essential oils; uplifting and stress reliever.
– Rosemary: dried rosemary and rosemary essential oil; refreshing and stimulating.
– Any other combination you can think of; be sure to check the essential oils properties prior to using them. You can see my previous blog post about essential oils for more information.
You will find that some scents will last longer than others and that some are stronger or weaker, so you might want to adjust the quantities of the essential oils to your liking.
I hope you enjoyed this project, please let me know if you’d like more projects like this in the comments below.
Essential oils are natural wonders, but to enjoy their full benefits you need to be sure you are using true essential oils and not diluted or synthetic versions of them.
Essential oils are not really oils, they are botanical extracts obtained from different components of a plant. The best extraction method is distillation; avoid solvent extracted oils as they involve chemicals in the process.
Essential oils can be extracted from different parts of a plant (seeds, blossoms, leaves, petals, fruits, bark, etc.)
Essential oils are widely used for their benefits and scent. They should be used with moderation and preferably diluted because they are very strong. They are soluble in carrier oils and alcohol, but not in water (unless an adequate emulsifier is used).
People suffering from medical conditions, children or pregnant women should consult a qualified practitioner before using essential oils.
How to choose quality essential oils?
Dark glass bottles are the best containers for Essential Oils, they keep them protected from light.
– The price of each essential oil is based on the rarity of plant material, origin and quantity of plant material needed to produced a certain amount of oil so it is normal that different essential oils will have different prices for the same amount (usually you can buy bottles of 5ml or 10ml). If the store you are in sell all essential oils with the same price, you are most likely not looking at true essential oils.
– Be sure that you are purchasing real essential oils; stay away from labels that say ‘fragrance’ or ‘perfume’ oil or ‘natural identical oil’.
– It is also important to know the properties of each essential oil you want to buy and also any side effects or allergies they may cause. Remember, if you are allergic to some kinds of food, you will also be allergic to that essential oil.
– The essential oils should be stored in dark glass bottles, don’t trust an essential oil that is packed in transparent bottles as the sun and light can harm their properties. Also avoid essential oils stored in plastic bottles or with rubber droppers as they can dissolve some of the chemicals in the plastic and rubber and become contaminated.
– Preferably choose essential oils that are labeled with botanical name, origin and extraction method.
After purchase, to maintain the quality of your essential oils, you should store them in a dark, cool place.
How to use essential oils?
Essential oils are mainly used for their therapeutic properties.
– Topical use: In skin care and hair care products, diluted.
– Aromatherapy and spiritual uses: Essential oils can be diffused or inhaled for psychological benefits.
– Internally: Some essential oils are safe to be used internally, however use extra caution and consult a qualified practitioner before using.
– Home: Many essential oils have antibacterial and anti viral properties, so they can be used as an aid in house cleaning and deodorizing. When using essential oils around the house beware that some essential oils are toxic for house pets, so always do your research before using or consult a qualified practitioner.
Be safe, be smart and do your research before purchasing essential oils. They are a true nature’s gift but should be handle with care for maximum benefits!
I hope you can find this information useful, let me know in the comments if you have any questions. Please feel free to share your experiences with essential oils.
This deodorant recipe is what I use myself; commercial deodorants are loaded with chemicals and antiperspirants are known to increase the chances of breast cancer. This is an all-natural recipe with ingredients you can find at home or in a natural store near you. You can adjust the amount of ingredients to your liking. I will go through the ingredients and their properties first and at the bottom of the post you’ll find the recipe.
Arrowroot is a starch and it will help keep the skin dry. You can also use cornstarch instead if you cannot find arrowroot, though I’ve never tried it myself, some people find cornstarch not as effective.
Baking soda is one of the best odor neutralizers and it has many uses for skin care products and also at home (watch out for a future post on this). My skin is very sensitive so I find that a small amount of baking soda is enough for me and doesn’t irritate my skin, if you have normal skin and need more odor control you can increase the amount of baking soda, however do not use more baking soda than arrowroot as it can be irritating.
Coconut oil is the binding ingredient and it is also moisturizing. I use refined coconut oil in my deodorant but you can also use extra-virgin coconut oil. Some people are allergic to coconut; in that case you can substitute Shea butter or other butter you like.
You can leave out the essential oils, but I like the extra antibacterial power and scent. I use Tea Tree for its antibacterial, antimicrobial and antiviral properties. Rosemary has a lovely fresh scent and it is also antimicrobial and antiseptic. You can substitute any other essential oil you like, just be sure to check if it has the right properties.
Recipe yields about 50ml.
Ingredients:
– 2 Tbsp Arrowroot powder (you can substitute corn starch)
– 2 tsp Baking soda (choose an aluminum free brand)
– Coconut oil (enough until desired consistency, 1-3 Tbsp)
Measure into a bowl the arrowroot and baking soda and mix them together. Add a little coconut oil at a time and mix with a spoon, keep adding coconut oil until you reach the desired consistency, then add the essential oils and mix. Spoon the mixture into a sterilized empty container. In the next few hours the deodorant will harden a little.
To apply, wash and dry your hands and take about a pee size amount with your fingers and rub it lightly on your pits until the coconut oil melts.
Hope you enjoy this as much as I do. Let me know in the comments if you try this or if you have additional questions.